“The XAMPP software is designed to be installed on Linux, Microsoft Windows, and MAC operating systems, offering web developers a platform to test their projects.
XAMPP provides easy access to APACHE, PHP, and MySQL, making it suitable for managing web projects such as WordPress and various PHP sites.
It’s important to note that XAMPP is specifically tailored for development projects and not intended for production use. It serves as a convenient method for theme developers to test their projects following the coding process in applications such as Visual Studio Code, Adobe Dreamweaver, and others.
While installing XAMPP on Microsoft Windows is straightforward, Linux distributions require some adjustments. In this guide, I will provide a step-by-step process to assist with the installation on Linux distros:”
1.Download latest XAMPP for Linux on their official web.
2.Open terminal and locate download folder with following command
cd ./Downloads
- Make downloaded file executed by chmod 755 as follows
Sudo chmod 755 ./xampp-linux-x64-8.2.12-0-installer.run
Note: You have to run a file name based with current version downloaded, for my case it is 8.2xxxxxx
- Launch the setup by running the following command
sudo ./xampp-linux-x64-8.2.12-0-installer.run
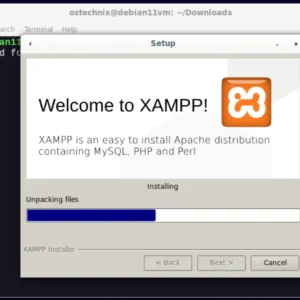
- XAMPP setup wizard will appear, as you have to go forward for installing it on your Linux distro
- Wait until installation is finished
- Done, allow launch application for configuring APACHE and MySQL
- Start APACHE server and MySQL database for testing.
- Last, test it if its working fine by entering the following url on web browser
localhost/dashboard
- If it is working, then everything is done.
- Create desktop shortcut
Change your working directory to
/usr/share/applications using the given command:
cd /usr/share/applications
Create desktop file with desktop extension as follow
sudo nano xampp.desktop
Then, paste the following lines in
xampp.desktop file, the save it by Ctrl+X then Y, then OK
[Desktop Entry]
Version=1.0
Type=Application
Name=XAMPP Control Panel
Exec=sudo /opt/lampp/manager-linux-x64.run
Icon=/opt/lampp/htdocs/favicon.ico
Terminal=false
StartupNotify=false
But XAMPP requires superuser privileges and I have used
Terminal=false line so how you are supposed to enter the password?
Well, you don’t have to. I will show you a workaround so that it won’t ask for a password. First, open the sudoers file using the given command:
sudo visudo
And if you are using nano, press Alt + / to jump to the end of the text file. And add the following line, so you can skip entering the password: Change yourusername to your actual username on machine.
yourusername ALL = NOPASSWD: /opt/lampp/manager-linux-x64.run
TAGS:
#Xampp